How To Install Blogger Template
In the vast world of blogging, presentation is key. Blogger, a popular blogging platform, offers a range of customizable templates that can transform the look and feel of your blog. Whether you're a newbie looking to personalize your first blog or a seasoned blogger wanting a fresh look, understanding how to install and customize a Blogger template is crucial. This guide will walk you through every step, from choosing the right template to customizing and troubleshooting. By the end, you'll have a beautifully designed blog that stands out from the crowd.
What Are Blogger Templates?
Blogger templates define the visual layout and functionality of your blog. They include everything from the arrangement of your posts to the color scheme and font styles. A well-designed template can enhance user experience, improve navigation, and make your blog more visually appealing.
Types of Templates
1. Free Templates: These are available through Blogger’s built-in library and various third-party sites. They’re cost-effective but might lack uniqueness.
2. Premium Templates: Offered by professional designers, these templates come with advanced features and customization options but usually require a purchase.
3. Custom Templates: Designed specifically for your blog, these templates offer the highest level of customization but involve a higher investment of time or money.
Why Customization Matters
Customizing your Blogger template allows you to align your blog’s design with your brand identity. This can improve readability, engagement, and the overall aesthetic appeal of your blog.
2. Choosing the Right Template
Identifying Your Blog’s Needs
Before selecting a template, consider the following factors:
1. Purpose of Your Blog: Are you focusing on personal stories, professional insights, or a specific niche? Choose a template that supports your content strategy.
2. Target Audience: The design should appeal to your audience's preferences and expectations.
3. Functional Requirements: Decide if you need features like an image slider, social media integration, or a custom header.
Popular Sources for Blogger Templates
1. Blogger Template Gallery: Start with Blogger’s official template gallery for a range of free options.
2. Third-Party Sites: Websites like ThemeForest, Templateify, and SoraTemplates offer both free and premium options.
3. Custom Design Services: For a unique touch, consider hiring a designer from platforms like Fiverr or Upwork.
Evaluating Template Features
When reviewing templates, check:
1. Responsiveness: Ensure the template looks good on all devices, including mobile phones and tablets.
2. Customization Options: Look for templates that allow easy adjustments to colors, fonts, and layout.
3. Support and Documentation: Good templates come with detailed documentation and support.
3. Preparing for Installation
Backing Up Your Current Template
Before making any changes, back up your existing template to avoid losing your current design settings:Log in to Blogger.
Navigate to “Theme” from the sidebar.
Click on “Backup/Restore.”
Click “Download Theme” to save a copy of your current template.
Ensuring Compatibility
Check if the new template is compatible with Blogger's platform and any existing widgets or custom scripts you use.
Downloading the Template File
Ensure that you download the template file in XML format, as this is the format Blogger accepts for uploading.
4. Installing the Template
Accessing Blogger’s Theme EditorLog in to Blogger.
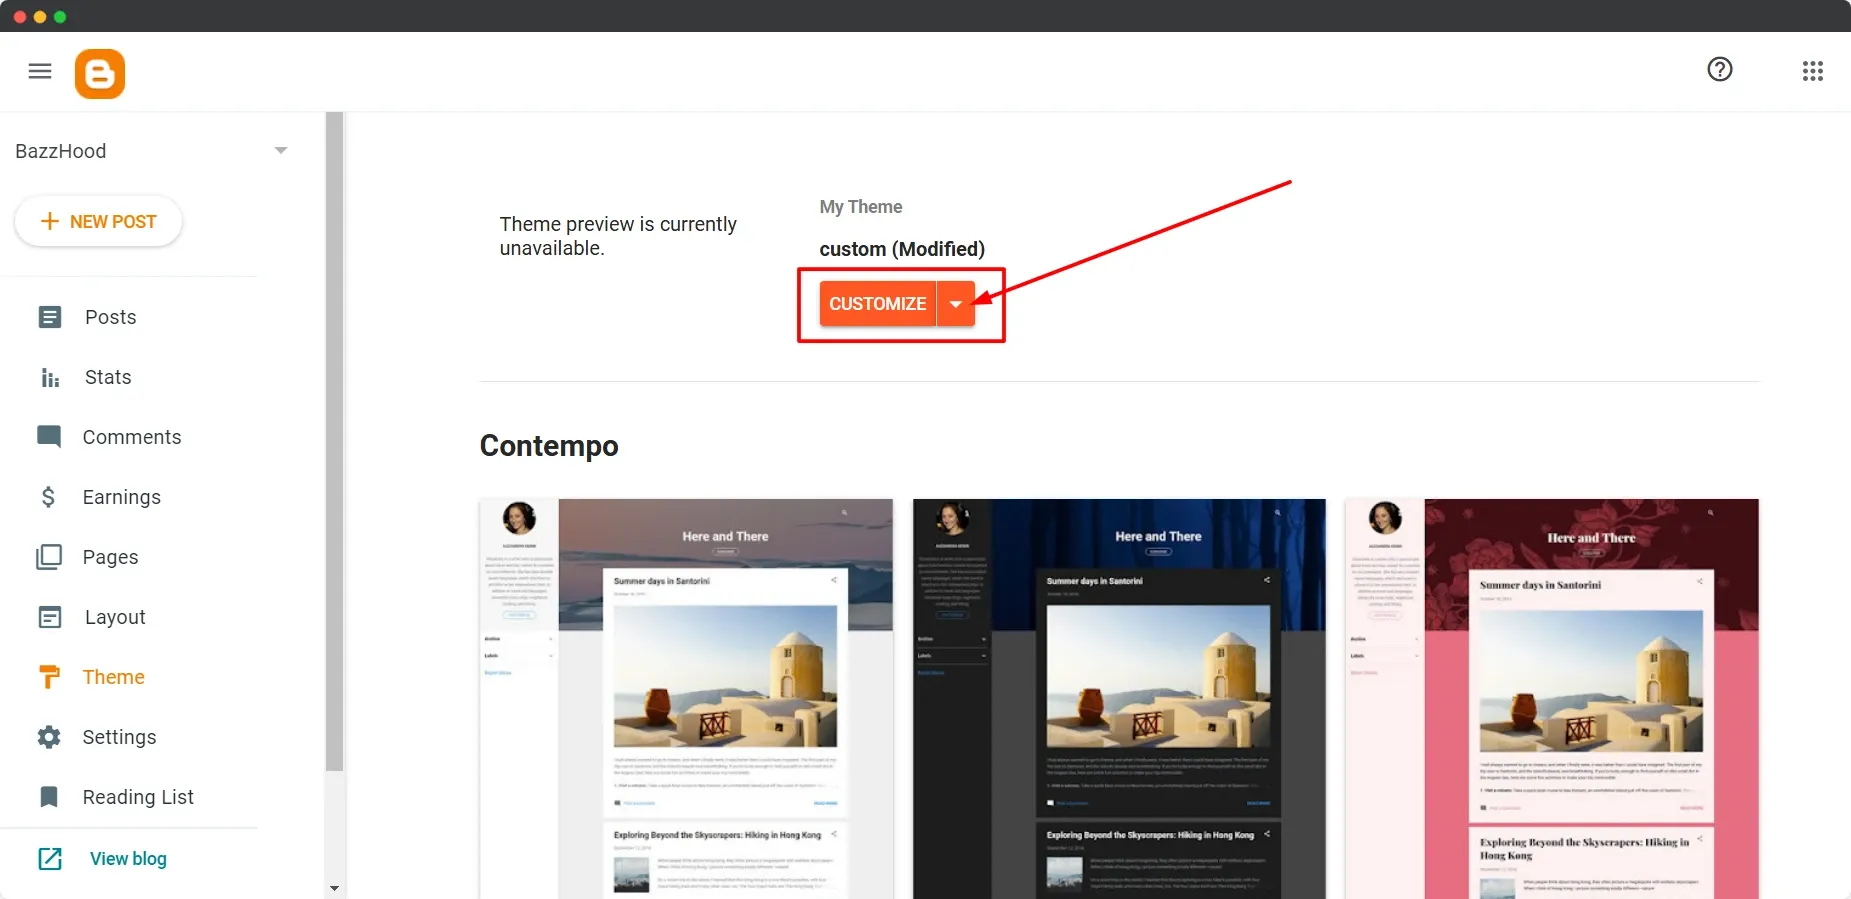
Go to “Theme” in the sidebar.
Click on the “Customize” button to access the theme editor.
Uploading the New TemplateIn the “Theme” section, click “Backup/Restore.”
Click “Choose File” and select the XML file of your new template.
Click “Upload.”
Applying and Publishing the Template
Once the upload is complete, the new template will be applied to your blog. Preview it to ensure everything looks right, and then publish the changes.
5. Customizing Your Template
Using Blogger’s Built-in Customization OptionsGo to “Theme” and click on “Customize.”
Adjust colors, fonts, and layout as needed using the available options.
Preview changes before saving.
Editing HTML and CSS
For more advanced customizations:Go to “Theme” and click on “Edit HTML.”
Modify the HTML and CSS to make specific changes to the layout and design.
Save your changes and preview your blog.
Adding Widgets and GadgetsGo to “Layout.”
Add gadgets like search bars, recent posts, or social media links.
Arrange gadgets according to your design preferences.
6. Troubleshooting Common Issues
Template Doesn’t Look as Expected
1. Check for Errors: Review your HTML and CSS for any errors.
2. Clear Cache: Sometimes, cached data can prevent changes from appearing.
3. Responsive Issues: Ensure the template is designed to be responsive or adjust the settings accordingly.
Errors After Installation
1. Revert to Previous Template: If issues persist, revert to your backed-up template and try a different one.
2. Consult Documentation: Refer to the template’s documentation for specific troubleshooting steps.
Responsive Design Problems
1. Test on Different Devices: Ensure the template is responsive on various screen sizes.
2. Adjust Media Queries: Modify the CSS media queries if needed to improve responsiveness.
7. Advanced Customization
Integrating Custom Scripts
For added functionality, you can integrate custom scripts into your template:Go to “Theme” and click on “Edit HTML.”
Add scripts to the <head> or <body> sections as needed.
Save and test the functionality.
Enhancing SEO with Template AdjustmentsEdit meta tags to include relevant keywords.
Optimize headings and alt attributes for images.
Improving Page Load SpeedMinimize CSS and JavaScript files.
Optimize images for faster loading.
8. Maintaining Your Blog’s Design
Regular Updates and Backups
Regularly update your template and back up your blog to prevent data loss and ensure compatibility with new features.
Monitoring Template Performance
Use tools like Google PageSpeed Insights to monitor and optimize your blog’s performance.
Making Design Adjustments
Continuously refine your blog’s design based on user feedback and changing trends.
9. Conclusion
Installing and customizing a Blogger template can significantly enhance your blog’s appearance and functionality. By following the steps outlined in this guide, you’ll be able to choose, install, and customize a template that aligns with your blogging goals. Remember to keep your design updated and optimized for the best user experience.